This blog post will show you the five most used echo commands in Linux with examples.
The echo command in Linux is a command that outputs the strings passed to its arguments. The echo command is supported on various Linux distributions such as Ubuntu, CentOS, Debian, and other OS like Windows. This command is most used in shell scripts and batch files to output status text to the screen.
In this tutorial, we will use the latest Ubuntu 22.04 OS, but you can choose any Linux distro per your choice. Let’s get started!
In this tutorial, we are going to show you the most used touch commands in Linux with examples.
The touch command is a standard command in Linux operating system used on daily basis by the system administrators, developers, and other users familiar with the Linux command line. With the touch command, we can easily create files, empty files, modify files, timestamps and etc.
In this tutorial we are going to explain to you 10 useful iptables commands applicable in any Linux distro.
Iptables on Linux servers are used for controlling the incoming and outgoing web traffic. The traffic is controlled by the iptables rules in the firewall written by system administrators or users familiar with Linux servers. The rules in iptables are stored in tables that have chains for every defined rule. In this blog post, we are going to use Ubuntu 22.04 as OS, but you can choose any distro if you want to try these iptables commands by yourself. Let’s get started!
The default disk usage command from UNIX based system summarizes directories on trees’ sizes, so it includes all their contents and individual files sizes. But, it is helpful to track down space hogs on your system. In other words, it will list directories and files that consume large amounts of space on the hard disk drive.
In this tutorial we are going to explain the Linux file permissions in different Linux distributions such as Ubuntu, CentOS, Debian, and AlmaLinux. The Linux file permissions are very important to understand and use properly, due to security reasons and user access rights. The user access rights are controlled by the permissions, attributes, and ownership. This defines who will be the authorized users and which directories and files will be accessed by them.
In this blog post we will explain the permissions on Ubuntu 20.04 OS. You can choose by yourself which OS to use. Let’s get started!
Finding files and directories in Linux is a very difficult task compared to Windows operating system. Especially if you are working on the server operating system without a Desktop interface. There are several ways to search files and directories in Linux. The simple and easiest way is to use the Linux terminal to search or locate files.
The find and locate are the most popular command-line tool used to search files and directories in Linux. The find command allows you to search for files and directories based on an expression. This way you can search files and directories based on their size, date, type, and ownership.
In this post, we will show you how to search files on the Linux terminal using the find and locate commands.
Asterisk is an open-source framework used for building communications applications including VoIP gateways, and conference servers. It is used by small businesses, enterprises, call centers, and governments worldwide. Asterisk uses a VoIP protocol that allows you to make a call using the TCP/IP without any cost. It provides very useful features including, voicemail, call recording, automatic call, music on hold, messaging, and more.
Asterisk can run on multiple operating systems, although it was originally created for Linux. Today, NetBSD, macOS, and Solaris users, among others, can install and use the Asterisk software with ease. (more…)
The role of permissions and files is much clearer in Linux when compared to Windows. Most people find it easier to understand compared to the complex system of groups and users that we find in Windows’ concept of permissions. For example, each file in a Linux-based operating system has three sets of permissions – the first being the permissions of the owner, the second being for a specific group of users, and the last group’s permissions are responsible for the rest of the system.
The levels of access to reading, writing, and executing are then described with a scale, ranging from 1 to 7. A value of ‘1’ allows for execution of the file, ‘2’ allows writing access, and ‘4’ allows the file to be read. To combine several permissions, you just add the numbers together. For example, if you want read and write access for a file, but no access to executing this file, the value to set for permissions would be 2 + 4, which is 6.
In this tutorial, we’ll see how to create a file in such a way that only the owner has full permissions over it. We’ll also see what happens when another user tries to read or modify that file. Finally, we’ll look at the role of “sudo” users who take on the root role for themselves, and how we can implement ironclad file security by hiding contents even from root if necessary.
Creating a File with “Owner Only” Permissions
Let’s say we have a file whose contents we want to have hidden from everyone else. In essence, others would be able to see that the file exists, and that’s about it. We don’t want them to see what’s inside it, or be able to modify it in any way. We do this using the following command:
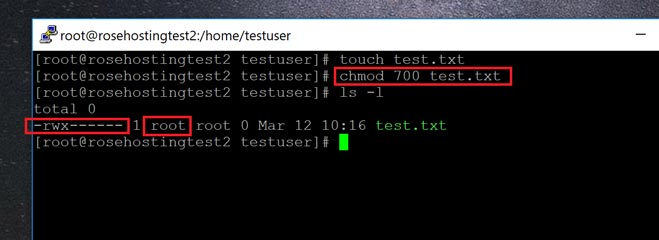
chmod 700 test.txt
Where test.txt is the name of the file that I want to protect. Once we run this command, the file turns “green” when you list it in a command like “ls”, and it displays the new file permissions with the “ls -l” command, like this:
Only the Owner can Access the File
Here, you can see the file permissions are restricted only to the first group – the owner – who has “rwx”, or read, write, and execute permissions. And the third column of “ls -l” is the owner name, which in this case is “root”.
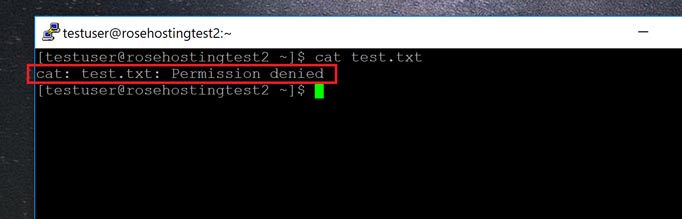
For convenience sake, we’ve created this file in the home directory of another user called “testuser”. Here’s what happens when we log in as the new user and try and read the contents of test.txt:
File access is Denied to the Other User
As you can see, testuser is denied the ability to access the file in any way. Any other user who tries to open this file will get the same error message. In this way, you can ensure that your important files are kept hidden from other users.
Allowing Others to ONLY Read the File
Perhaps there’s an important document or set of rules that you want others to be able to read, but not modify. We can achieve this using the following command:
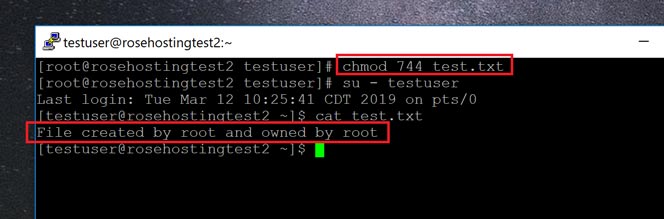
chmod 744 test.txt
Here, “744” instead of “700” gives everyone else the permission to read the file, but nothing else. Here you can see that “testuser” is able to access the contents of the file after it has been assigned its “744” permissions:
Allowing Other Users to Only Read the FIle
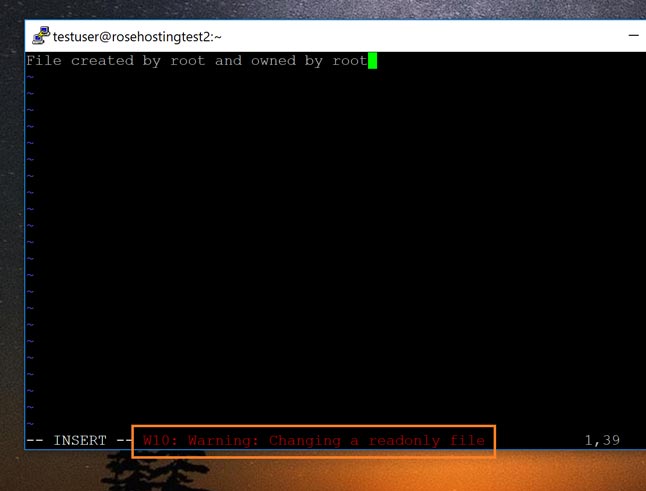
However, if they then try and modify the file using a file editor, like “vi”, they get the warning you expect as shown here:
The File is Read-only – It Can’t be Edited
Use this variant of the chmod command when you need others to see the file, but not modify it in any way.
Root or “Sudo” Users Still Have Access
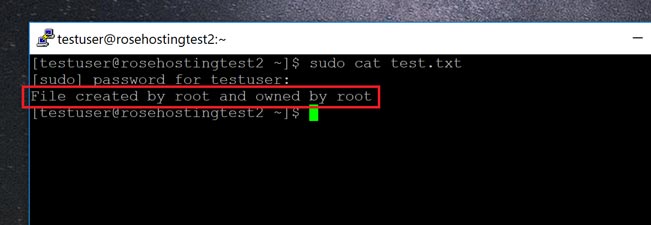
Unfortunately, file permissions don’t apply to root or sudo users. For this example, I’ve added “testuser” to the sudoers file so they can use execute root commands using sudo. And when they do this, they can access the protected file as shown here:
Root Users have Complete Control Over the File
There’s no way around this using file permissions. Root, and users belonging to the “wheel” group can simply use “sudo” to get around these restrictions. Of course, it’s good practice to be wise with the capabilities you give your users – handing out sudo permissions to everyone is not a good idea. Since this is common practice, well-configured Linux systems shouldn’t have this problem.
True File Security – Even from Root
Ultimately, the only way to hide your files from everyone – including root users – is to use passphrase-based encryption. No other method can hide your information with 100% security from everyone, including the root and sudo users!
Of course, you don’t have to do any of this if you use one of our Outsourced Server Support Services, in which case you can simply ask our expert Linux admins to set up your file permissions for you. Just sit back, relax, and let our admins take care of the issue for you. They are available 24×7 to help you with your requests.
PS. If you liked this post on denying file permissions to everyone except yourself, please share it with your friends on the social networks by using the share shortcut buttons, or simply leave a comment in the comments section below. Thanks.
Back when Linux was in earlier development, it used to utilize a “flat” directory structure. This meant that unlike the hierarchical “tree-link” folders we have today, everything was located inside of a single folder. No subdirectories existed. It also meant that each file had to have a unique filename, without exceptions!
All of that changed when Linux baked “hard links” into its kernel. The special character sequence “..” was defined to mean the parent directory, and it’s now the backbone of the modern Linux filesystem as we know it today. With that, we can see the importance of hard links – and in this tutorial, we’ll explain the difference between symbolic links and hard links, and the use-case scenarios, as well as when to use each type of link.
In this article, we will talk about how to find out a list of all open ports in Linux but before that, we will mention about ports in computer networking. In software terms, and more definitely in computer networking, a port is an available network location implemented in an operating system to assist differentiate traffic destined for various services or applications.